Indigo8 allows you to connect to your Xero XERO account so that you are able to send invoices, credit notes and payments to Xero with a click of the mouse.
...
| Info |
|---|
Before starting out, you will need to connect your Xero account with Indigo8. |
You will also need your list of chart of accounts within XERO to link up were your invoices and credit notes will be sent to.
...
Click the Settings tab and click into Accounts. 
...
Select your trading entity Trading Entity that you wish to connect.
...
Select the preferred option on the XERO Tax Types.
...
Australian orders are normally set as GST ON INCOME. International currencies are normally slightly different.
...
2. Once this has been set up for all your trading entities you will need to set the connection between the 2 systems.
Click Connect to XERO.
Select your XERO connection such as Indigo8 Australia Pty Ltd - this will normally be your business name.
Click Connect to Selected Xero Account and follow the appropriate prompts. 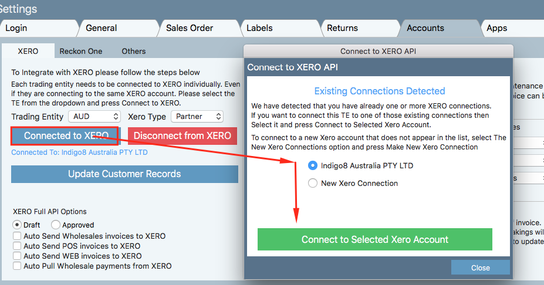
...
3. Entering sales account numbers
Once point 2 is done, you should be ready to start the exporting process.
...
Ensure your export format is set as XERO API FULL.

5. Open up your XERO account and locate your chart of accounts.
Find your sales account and locate the code.
...
Once successfully exported the below message will appear. Click close once done.
...
9. Now open Xero in your web browser. When you login you will be taken to the home page for your account in Xero, also known as your dashboard. You will see that the invoices that have been moved from Indigo8 Lite are currently waiting in Draft Invoices. Click on Invoices owed to you above it
...
10. You will be taken to a new window click on the Draft (3) button
...