Customers may not always be satisfThere may be a time were you need to update the sales order quantity after the purchase order has been raised. Below shows you the steps to help you carry this through.
Step-by-step guide
...
1
...
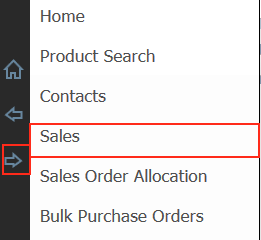
1. Click on the menu arrow, and click on Sales
2. If you're returning through NEW RETURN follow this step
On the sales screen, in the top right corner locate the button New Return and click it

...
Find the original sales order and open it up. At the bottom of the screen there will be a button called Create Return. Select this.

There is a checkbox to automatically load the SO QTY into the return. If this is the case check this and then click Create RA.

3. The Return screen will open. The Customer drop down box located on the upper left of the screen is a mandatory field. Select the customer that is requesting to return an item or items. Complete the other fields as required.

...

Search for the styles you wish to return, and then click and drag the relevant style or styles onto the Return Screen.
...
If you created a return through a customer sales order then all your details should appear automatically. You can adjust the qty and style details as you need.

5. Fill in the following fields. Including the location for the customer to return the item(s), the warehouse it will be returned to, the reason and sub-reason for the return and any comments. All the drop down lists are configurable in Settings, refer to Customising Return Settings for more details.

Drag as many items onto the return as you wish, when you're ready, proceed to step 6.
6. Click the Generate RA button (stands for Return Authorisation). This will will generate a Return Authorisation ID for the system, so there is a record of you granting this return. It will also produce a document that you can keep and/or give to the customer as a record of the transaction. The customer can reference this number when the goods are returned, and you can enter this number into the system, view the return details and easily apply credit to the customer's account. See step below for more information.


Step 2 - Crediting the Customer's account upon arrival of item(s)
Once you receive the items from the customer, you will want to generate a credit note for them.
1. Open the Sales screen
2. To search for a return, go to Type drop down, select Return and click search. This will retrieve all return authorisations. If you want to narrow the search, enter information in another search field such as Customer then click Search.

3. Once you locate the relevant Return, click the + button to open it.
4. Now that it is open, you will notice a tab called Credit Note click on that.

5. You can then click Auto Fill with RA QTY to automatically pull the RA QTY
Otherwise if the qty is slightly different you can manually override the qty by clicking into it and entering the qty that you want.

Alternatively, if every item needs to be auto-filled, select RA QTY and that should automatically populate the RA QTY.

6. Click the GENERATE CREDIT NOTE button to generate the credit note.
If you need to add an extra item on the credit note, you can click ADD EXTRA and fill in the price.

7. The credit note should automatically appear which you can then save, print or email out to your customer.

Automatically, as a result of the credit note being generated, the credit amount will be available for the customer in the Accounts screen, specifically the Receive Payments screen. When making a payment against an invoice, the customer can choose to utilise that credit in the transaction or leave it for a later time.

Related articles
| Filter by label | ||||||||||||||||||
|---|---|---|---|---|---|---|---|---|---|---|---|---|---|---|---|---|---|---|
|
...
| hidden | true |
|---|
...
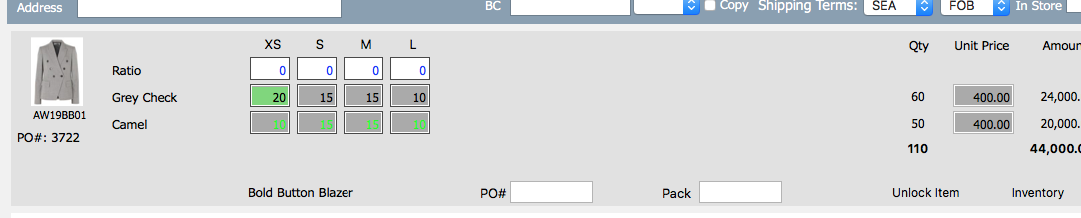
Open up the sales order and locate your style that you wish to change.
You will notice there is a PO created as this appears directly underneath the style image. In this example you can see that this style is assigned to PO#3722.
Click Unlock Item. You will receive the below pop up.
IMPORTANT: It's very important to be aware of which button you are selecting here.
If you say NO this means you will not be updating the PO QTY.
If you say YES this means YOU WILL be updating the PO QTY.
3. If you need to update the PO QTY select YES

Make your changes as required and don't forget to click SAVE PO QTY

Then it should automatically lock in your changes that you have made.
4. Generate your sales order so that the new quantities flow through.
5. As a last step it is good to go into the PO that you have updated and check if the quantities updated.
Click on the PO NUM and have a look.
6. If you DON'T need to update the PO QTY click NO.
Generate your sales order so that the new quantities flow through to the sales order.

NOTE: There is a setting within Indigo8 so that only certain users can update the SO quantity after the PO is created. Below is an example of how this looks.
Contact an Indigo8 Member and they can turn this on for you.
